Introduction
Model railroading is a meticulous hobby focused on crafting lifelike miniature worlds, where every detail plays a crucial role. Among the many ways to enhance your model train layout, HO-scale weathered gray split shakes stand out as a fantastic choice for adding authenticity and character. These tiny roofing pieces may seem insignificant, but they bring remarkable realism and depth to your models. By simulating the rustic or aged appearance of real-world structures, weathered gray split shakes can transform a standard model into a strikingly realistic piece. This guide delves into the benefits, application guidelines, and best practices for using HO-scale weathered gray split shakes to achieve a convincingly aged look in your model railroad.
What are HO-Scale Weathered Gray Split Shakes?
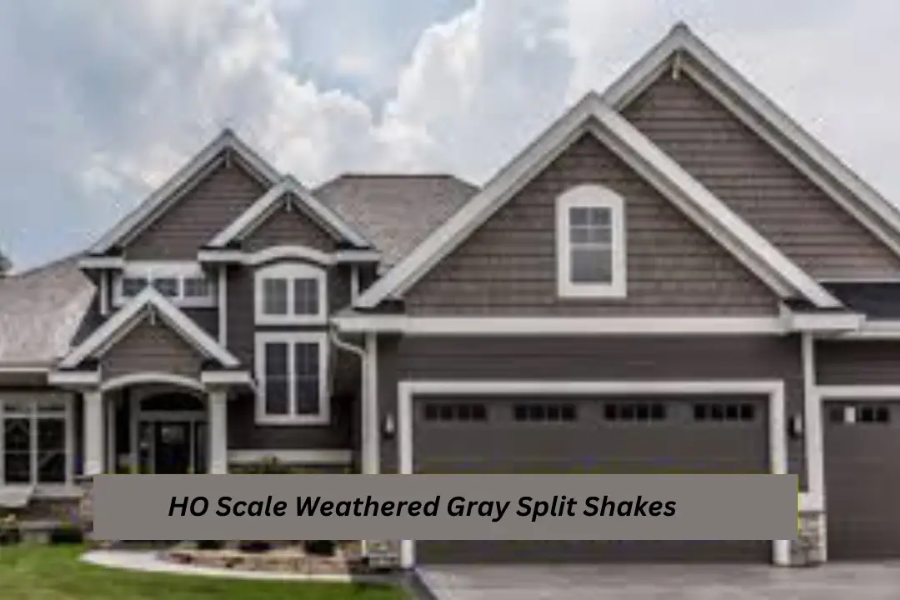
HO-scale weathered gray split shakes are miniature roofing shingles designed to mimic the look of aged wood shingles commonly found on vintage structures. These model pieces are typically crafted from high-quality materials to replicate the appearance and color variation of weathered wood. The weathered gray color adds a layer of authenticity, suggesting the shingles have endured the elements over time. This realistic effect can significantly enhance the depth and character of model buildings, making them look more genuine and historically accurate.
Why Choose Weathered Gray?
The weathered gray color is ideal for creating a sense of age and history in your model railroad. It suggests that the building has been exposed to the elements for a considerable time, adding a layer of authenticity that makes your layout stand out. The subtle tones and textures of weathered gray shakes contribute to a realistic and visually engaging scene.
Advantages of Weathered Gray Split Shakes Construction
Realism: Weathered gray split shakes add intricate detail to your HO-scale models. Their natural, aged appearance enhances realism and visual interest, bringing a more authentic look to your railroad scenes.
Variety: These shakes are available in a range of shades and textures, allowing modelers to select the one that best fits their specific project. This variety ensures you can find the perfect match for any building style.
Durability: Constructed from high-quality materials, weathered gray shakes are built to last. This durability ensures that your models will remain visually appealing for years to come, withstanding the test of time.
Quality HO-Scale Weathered Gray Split Shakes
To achieve the desired effect, it is crucial to select weathered gray split shakes with the following attributes:
Material Quality: Opt for shakes made from sturdy and resilient materials that closely mimic the look and texture of real wood. High-quality materials provide a more authentic appearance and better overall performance.
Color Gradient: Choose shakes with subtle color variations to replicate the natural aging process. Multiple shades of gray can enhance the realism of your model’s roofing.
Scale Accuracy: Ensure the shakes are accurately scaled to fit your HO-scale models. Proper scaling maintains detail and ensures a consistent look across your layout.
Getting Your Model Ready for Applying Shakes
Proper preparation is essential before applying weathered gray split shakes. Follow these steps to ensure a smooth application process:
Setting Up a Clean and Organized Area: Keep your workspace tidy and well-organized to avoid losing small parts and ensure a smooth workflow. This preparation helps you work efficiently and accurately.
Planning the Layout: Arrange the shakes in a staggered pattern, as they would be installed in real life. This method adds visual interest and mimics the natural installation of roofing shingles.
Weathered Gray Shake Application Techniques
Applying HO-scale weathered gray split shakes requires careful attention to detail. Follow these techniques for the best results:
Cutting the Shakes: Cut your wood or plastic sheets into small, shingle-sized pieces. Precision is crucial, so take your time to ensure uniformity.
Applying the Base Coat: Apply a base coat of gray paint to the shakes. This base coat serves as the foundation for the weathering process, giving the shingles a uniform color.
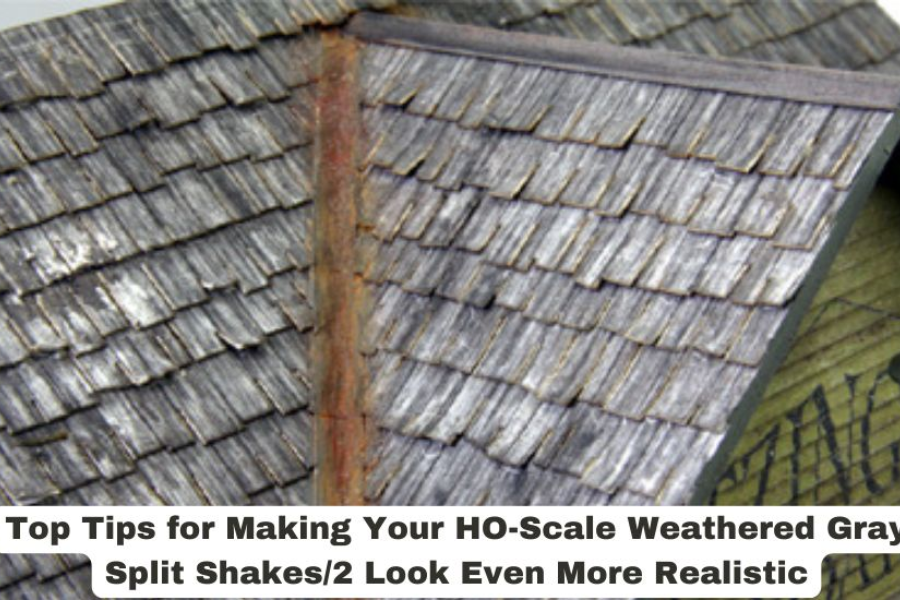
Adding Weathering Effects: Once the base coat is dry, use weathering powders and washes to create a worn, aged look. Focus on areas where natural wear and tear would occur to enhance realism.
Final Touches and Detailing: Add highlights or darker streaks to give the shakes a convincingly old and weather-beaten appearance. These final touches can significantly enhance the overall effect.
Using Adhesives
Choose strong adhesives that ensure the shakes remain securely in place. A clear adhesive is preferable as it won’t alter the appearance of the shingles. Apply the adhesive sparingly to avoid excess that could mar the look of your model.
Weathering Effects
Enhance the natural weathering effects by using additional weathering powders, washes, or dry brushing techniques. These methods help to outline textures and add shadows, replicating the natural aging process.
Tips for Achieving Realistic Weathering
Techniques for Adding Texture: Use a dry-brushing technique to add texture to the shakes. Lightly dab your brush in paint and sweep it across the surface to create a rough, textured look.
Using Weathering Powders and Washes: Apply weathering powders and washes sparingly to add depth and variation. Avoid overdoing it to maintain a realistic appearance.
Common Mistakes to Avoid: Be cautious of over-weathering, which can make your shakes look unrealistic. Aim for subtlety and consistency in your weathering process to achieve the best results.
Incorporating Shakes into Your Layout
Best Placement Ideas: Place weathered shakes on older buildings, sheds, or structures that logically show signs of wear and tear. This placement enhances the storytelling aspect of your layout.
Enhancing Overall Realism: Combine weathered shakes with other details like faded signs, rusted metal, and cracked paint. This combination creates a cohesive and realistic scene.
Maintaining Your Weathered Shakes
Cleaning and Upkeep: Regularly dust your model buildings to maintain their appearance. Use a soft brush to avoid damaging delicate parts.
Long-Term Durability Tips: Protect your weathered shakes with a clear matte finish. This sealing helps preserve the appearance and shields the model from handling and environmental factors.
Advanced Techniques for Experienced Modelers
Custom Shading and Coloring: Experiment with different shades of gray and additional colors to create unique looks. Custom shading can add a personalized touch to your models.
Creating Unique Patterns: Use stencils or masks to create intricate patterns on your shakes. These techniques add another layer of detail and interest.
Showcase: Examples of Beautiful Layouts with Weathered Shakes
Inspiration from Fellow Modelers: Explore the work of other modelers for inspiration. Online forums and social media are excellent resources for finding examples and advice.
Gallery of Stunning Layouts: View examples of layouts that use weathered gray split shakes effectively. These can inspire your projects and demonstrate the potential of these details.
Where to Buy Weathered Gray Split Shakes
Recommended Retailers: Many hobby shops and online retailers offer weathered gray split shakes. Reputable sources include Hobby Lobby, Woodland Scenics, and Amazon.
Online vs. Local Hobby Shops: Online stores provide convenience and variety, while local hobby shops allow you to see the product before purchasing and often have knowledgeable staff to offer advice.
By following these guidelines and incorporating weathered gray split shakes into your model railroad, you can achieve a highly realistic and captivating layout that stands out for its attention to detail and authenticity.
Conclusion
Incorporating HO-scale weathered gray split shakes into your model railroad can profoundly enhance the authenticity and visual appeal of your layout. These meticulously crafted shingles offer a strikingly realistic representation of aged wood roofing, contributing to a more immersive and historically accurate scene. By choosing high-quality materials, employing careful application techniques, and paying attention to details like weathering and placement, you can transform your model buildings into captivating works of art. Whether you’re aiming for a rustic charm or a weather-beaten look, weathered gray split shakes provide the perfect touch to bring your miniature world to life. Embrace these techniques and watch your model railroad evolve into a testament to your dedication and skill.
FAQs
1. What are HO-scale weathered gray split shakes?
HO-scale weathered gray split shakes are miniature roofing shingles designed to replicate the appearance of aged wood shingles in model railroading. Their weathered gray color mimics the look of shingles that have been exposed to the elements over time.
2. Why should I choose weathered gray split shakes for my model railroad?
Weathered gray split shakes add realism and character to your models by simulating the natural aging process of roofing shingles. This enhances the authenticity of your layout and creates a visually engaging scene.
3. What materials are best for HO-scale weathered gray split shakes?
High-quality materials that closely mimic real wood and offer a variety of color gradients and textures are ideal. Look for shakes made from durable materials to ensure longevity and a realistic appearance.
4. How do I prepare my model for applying weathered gray split shakes?
Ensure your workspace is clean and organized, plan the layout of the shakes, and arrange them in a staggered pattern to mimic real-life installation. This preparation helps ensure a smooth application process.
5. What techniques should I use for applying weathered gray split shakes?
Cut the shakes precisely, apply a base coat of gray paint, and then add weathering effects using powders and washes. Finish with highlights and darker streaks to create an authentic aged look.
6. How do I choose the right adhesive for applying the shakes?
Use a strong, clear adhesive to ensure the shakes stay in place without altering their appearance. Apply it sparingly to avoid excess that could detract from the model’s look.
7. What are some common mistakes to avoid when weathering shakes?
Avoid over-weathering, which can make the shakes look unrealistic. Aim for subtlety and consistency to maintain a natural appearance.
8. How should I maintain my weathered shakes?
Regularly dust your model buildings and protect the shakes with a clear matte finish to preserve their appearance and shield them from handling and environmental factors.
9. Where can I buy HO-scale weathered gray split shakes?
You can find these shakes at hobby shops and online retailers such as Hobby Lobby, Woodland Scenics, and Amazon. Local hobby shops offer the advantage of seeing the product in person and receiving expert advice.
10. Can I customize the appearance of the weathered gray shakes?
Yes, experienced modelers can experiment with different shades of gray, create unique patterns using stencils, and apply custom shading to add a personalized touch to their models.
Stay in the know with the latest news and updates on essentialtribune